
Matvhist Tutorial
Table of Contents
- Introduction
- Installation
- About the Examples in this Tutorial
- Hello VHIST: First Steps with Matvhist
- More about VHIST files, sections and workflows
- Adding more Information to a Section
- User-defined Attributes
- Previews
- Embedding Files
- Advanced Embedded Files
- More Advanced Embedded Files
- Recording Time and Matlab Diary
- Embedding Matlab Sourcecode
- Organising Workflow Documentation
- Functions for Workflow Documentation
- Vhist Output
VHIST for Matlab 1.84.0.3018, Jun 28 2013
Introduction
The programming language Matlab, created by MathWorks (TM), is highly suitable for scientific computing, rapid prototyping of mathematical problems or algorithms, automation of workflows and can even be used as a general purpose scripting language. One point at which Matlab misses out, however, is a generic and easy to use way to document the results of executed scripts or workflows of successively run scripts.
Matlab provides functions to save individual variables or all variables of the current workspace into one file. This file, however, is stored in a binary format and it can be cumbersome to start a new Matlab session just to observe the value of one stored variable. Moreover, a variable configuration alone is often useless if the corresponding source code revision is not known or the source code is not available.
Saving the output, which Matlab writes into it's command window, into a log file is possible, even though it is not as obvious as it could be and many users probably do not employ this functionality. If you generate a log file for your script, the logfile is stored as a seperate file, next to the .mat file containing the workspace variables.
There is no easy way in Matlab to record information about files used in or generated by the script. Filenames, -sizes and even md5 checksums, however, can be very useful when you later want to verify that the files on your disk are the ones which have been generated by the Matlab script. There is no trivial way to query the name of the current user or host, either.
Even if you write routines for all these tasks yourself, all the logging and status information will be spread amongst multiple files. If your input data is processed by several consecutive Matlab scripts, even more files containing status information will be generated and probably be distributed amongst several directories. Keeping track of all these individual files can be tiresome and prone to errors.
To solve all of these problems, we have developed VHIST, a framework to gather various information about a complete workflow at a single location, in one file. For a detailed description of VHIST, go to http://www.nf.mpg.de/vhist.
VHIST was designed as a set of commandline and graphical tools, which are available on all major platforms (Windows, Mac Os X, Linux) and can be called from any script or program as an external processes. Matvhist is our attempt at integrating these tools directly into Matlab, so that all lowlevel details are hidden from the user. You should be able to concentrate on more important aspects of your work and spend as little time as possible documenting your work. Documenting should happen automatically.
Installation
To install the Matlab-VHIST bindings (matvhist), simply download the matvhist zip archive from http://www.nf.mpg.de/vhist and unzip it to some path on your harddisk. Afterwards, start Matlab and type
addpath('/path/to/matvhist/directory');
savepath('~/pathdef.m');
Here, /path/to/matvhist/directory is the path to the directory, which
contains the directory +matvhist. When you want to uninstall matvhist later on,
just delete the directory and remove the /path/to/matvhist/directory entry
from the pathdef.m file in your user's directory.
That's all. You can now use matvhist with your Matlab installation. If you
do not want to add matvhist permanently to your Matlab path, you can instead
execute the addpath function every time you want to use matvhist.
About the Examples in this Tutorial
All examples in this tutorial are also contained within the matvhist
zip archive in the subdirectory examples/. If you have performed the
steps in the section Installation, you should be able to run all examples
unmodified.
Hello VHIST: First Steps with Matvhist
To get started, we will create the simplest matvhist script possible. Create a
new script inside Matlab, name it helloVHIST.m and write the following lines
into it:
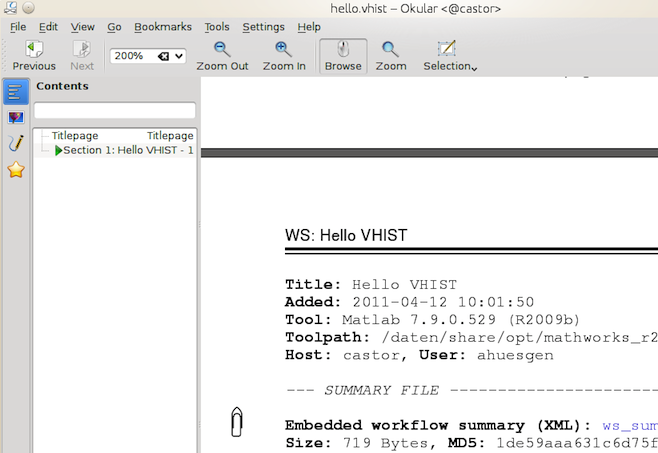
section = matvhist.VhistSection('Hello VHIST');
section.appendSectionToVhistFile('hello.vhist');
The first line of this snippet will create the description for one section within a VHIST file. The title of the section will be 'Hello VHIST'. Up to this point, no VHIST files have been touched and nothing has been modified on disk. The second line appends the section created in the first line to a VHIST file. If the VHIST file does not exist, yet, a new VHIST file is created. Otherwise, the section is appended to the end of the VHIST file.
Now save this script and run it. Matvhist will create a new empty VHIST file and insert a section with the title 'Hello VHIST' into it. If you run the script multiple times, matvhist will append a new section each time you run the script.
Open the VHIST file using a PDF Browser. As you can see, the generated section has the title 'Hello VHIST'. Moreover, the section already contains a lot more information then you have specified within the Matlab script. For example, vhistmat has already learned about the name of your user and your computer and has added this information as well. A fundamental idea of matvhist is to automatically derive as much information as possible, so that you have to type as little as possible.
More about VHIST files, sections and workflows
The purpose of VHIST is to document workflows. A workflow usually begins with one or several files which contain data. Whether the data comprises images recorded by a camera, moviefiles, a tomographical 3D image recorded using a MRI scanner, measurements of some other kind of sensor, a text dump of a database or something completely different is not important.
This data is usually read into memory, parsed, translated into some internal format, modified, processed and/or analysed and the results are written back to disk. This process is what we call a workflow. The simplest workflows consist of just one step. For example, you might load a raw photo into memory and write it back to disk as a jpg or png image. Other workflows contain several steps, for example, you may load a MRI image, filter it, segment it into different regions and then analyse these regions individually. Each of these steps is a workflowstep inside a bigger workflow. The files generated by one step are usually used as the input data in the next step.
Each VHIST file documents a run through such a workflow. Each workflowstep is stored inside the VHIST file as one section. This section contains all information about the workflowstep, such as files used in this workflowstep, additional parameters or config files as well as meta-information about the input files or generated data. Even whole files can be embedded within a VHIST sections. This feature is quite useful to embed config files, logfiles or even the generated data inside the documentation.
Adding more Information to a Section
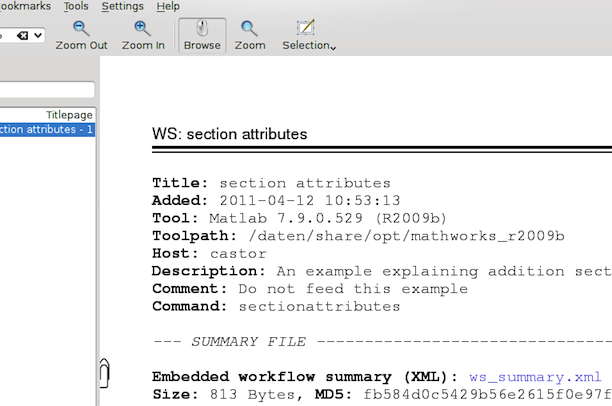
In the previous example, we only specified the title of the section. There are, however, more pre-defined attributes we can specify. We can give each section a title, a description and an additional comment. The comment may contain further information, which does not belong into the title or description, but is still good to know. Further, we can specifiy the command executed (in the case of a Matlab program, this is usually the name of the script or function) and record the username, host, version and installation location of Matlab.
All these information can either be specified in the constructor of the
class VhistSection or later on using properties. The following snipped
section = matvhist.VhistSection('section attributes', ...
          'An example explaining addition section attributes', ...
          'Do not feed this example');
section.command = 'run sectionattributes.m';
section.user = {};
section.appendSectionToVhistFile('attributes.vhist');
sets a number of additional attributes. If you want to leave out an
attribute in the constructor or explicitly disable an attribute
(for example if you do not want to display the user name in the VHIST
file), use an empty cell array {} as the value for this attribute.
User-defined Attributes
The pre-defined attributes available only give the option to supply very generic information, which fits almost every possible usecase. Usually, however, we want to add a lot more information, which is specific for the concrete usecase. For this purpose, user-defined attributes have been added to VHIST. You can declare any number of key-value pairs and add them to a section within a VHIST file by assigning a map object to the userAttrs property of a section:
section = matvhist.VhistSection('User-defined Attributes');

% create a map containing attributes
attrs = containers.Map();
attrs('Number of Iterations') = '25';
attrs('Temperature') = '23.4 C';
attrs('Patient Name') = 'John Doe';
attrs('Parameters') = '[0.3, 0.5, -1.2, 8.2]';

section.userAttrs = attrs;
section.appendSectionToVhistFile('attributes.vhist');
The information presented in user-defined attributes is often stored
in variables in the form of numbers, vectors, matrices or strings.
The property userAttrs, however, can only deal with maps, in which
both, the keys and the values, are strings. Therefore, a lot of
"stringification" is neccessary. To make life easier, we can gather
all user-defined information inside a matlab structure and use the
function structToMap to convert the data into a suitable map object.
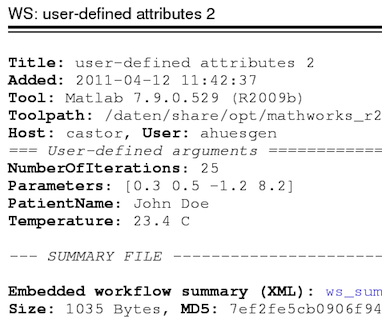
section = matvhist.VhistSection('user-defined attributes 2');

% create a struct containing attributes
attrs.NumberOfIterations = 25;
attrs.Temperature = '23.4 C';
attrs.PatientName = 'John Doe';
attrs.Parameters = [0.3, 0.5, -1.2, 8.2];

section.userAttrs = matvhist.structToMap(attrs);
section.appendSectionToVhistFile('attributes2.vhist');
structToMap can handle numeric and logical values as well as vectors,
matrices and three-dimensional tensors of these types. Further, it can
work with strings, cell arrays of strings and nested
structs. structToMap has an optional second argument, which will be
used as a prefix to all fields. The call
section.userAttrs = matvhist.structToMap(attrs, 'attrs');
will prefix all attributes with 'attrs.', so that the field NumberOfIterations will be displayed as 'attrs.NumberOfIterations' inside the VHIST file.
Important Matlab's containers.Map objects are derived from the handle class
and are therefore (in contrast to most other types in Matlab) mutable. This means that
the following code
section = matvhist.VhistSection('section');
section2 = section;
section2.userAttrs('newkey') = 'newvalue';
will modify the userAttrs object of both objects, section and section2.
Keep this in mind when passing section objects as arguments to your own
functions. All functions provided by matvhist will create a copy of the
map object before modifying it, so that the original map is never modified.
You can achieve the same behaviour by using matvhists mathvist.copyMap
function.
Previews
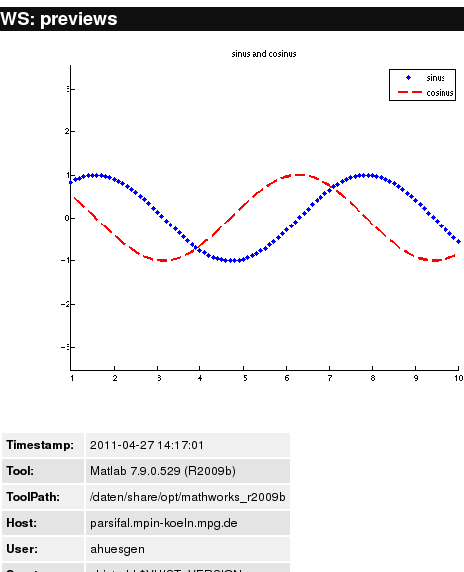
A picture is worth a thousand words. Often, this is also true for documenting workflows. Therefore, VHIST supports embedding preview images into a VHIST file. These preview images are shown in the PDF representation of the VHIST file can then be displayed by more sophisticated VHIST file viewers, such as our own VHISTzard. A preview can be the plot of a graph describing the generated data or a simple two-dimensional image. Choosing a suitable representation for your workflow is up to you.
Matvhist can create preview images from three different types of data. First,
if you have already generated a bitmap file (supported formats are jpg and
png), you can directly specify the file's filename. This file will then be
included in the VHIST file and displayed as a preview for the section.
Alternatively, you can supply a Matlab figure handle or a Matlab matrix
(which can be displayed using the imshow function). These types will be
exported into a temporary png file and then embedded into the VHIST file.
section = matvhist.VhistSection('previews');

% create a figure
fhandle = figure;
hold on;
axis equal;
plot(1:0.1:10, sin(1:0.1:10), 'b.', 'MarkerSize', 10);
plot(1:0.1:10, cos(1:0.1:10), 'r--', 'LineWidth', 3);
legend('sinus', 'cosinus');
title('sinus and cosinus')

section.previews = {fhandle};
section.appendSectionToVhistFile('previews.vhist');
Embedding Files
Most usecases work with some kind of files. In most cases, the content of one or several files (e.g. an image) is read into memory, processed (e.g. filtered or analysed) and then the modified data is written back to disk into a new file. Often, additional config files, which modify the behaviour of the executed program or script are taken into consideration. Log files may be generated and stored, as well.
All these files are essential for your workflow and should be documented or even included inside the documentation itself. Therefore, VHIST supports embedding files within a section of a VHIST file. In the case that a file is too big to be embedded or should not be embedded for other reasons, VHIST can still record the filename, the size of the file as well as an md5 checksum for the file's content. This information can be used to verify that the files on your filesystem are the same files that were used in the workflowstep.
To include a file inside a VHIST section, you have to create an instance
of the VhistFile class. The following snippet creates a section and embeds
two files in this section:
section = matvhist.VhistSection('embedded files');

file1 = matvhist.VhistFile('input.png', 'in');
file2 = matvhist.VhistFile('output.png', 'out');

section.files = [file1, file2];
section.appendSectionToVhistFile('embedded-files.vhist');
The first argument of the VhistFile constructor is the name of the file.
The filename may be an absolute path or a path relative to Matlab's current
working directory (the directory returned by Matlab's pwd function).
The second arguments specifies, whether the file was used as an input in the
workflowstep or was generated by the workflowstep and is therefore an output
file. Valid values are ='in'= and ='out'= (both must be written in lowercase
letters).
By default, a file is automatically embedded inside a VHIST section.
If you do not want to embed a file (for example because it is quite big),
you can set the property embed to false:
section = matvhist.VhistSection('embedded-files2');

file1 = matvhist.VhistFile('very big input file.png', 'in');
file1.embed = false;

section.files = [file1];
section.appendSectionToVhistFile('embedded-files2.vhist');
In this case, VHIST will still detect the size of the file and generate an md5 checksum for the file's content.
Advanced Embedded Files
As it was the case with VhistSections, there is a multitude of additional
options, which can be set for each VhistFile object. Besides the filename,
a file can have a description and comment, as well as a string specifying
the filetype. If you do not specify a filetype, matvhist will try to
automatically detect the filetype. Matvhist is aware of about 200 MIME-types
and the corresponding file extensions and tries to match the filename against
this database.
A VhistFile objects has a property previews, which works just like the
previews-property of VhistSection objects. Simply pass a cell array of
filenames, figure handles and/or images in matrix form to the property.
For use-case specific arguments, a containers.Map object can be passed to
the userAttrs property. See User-defined Attributes for more information
on the userAttrs property.
The following snippet shows some of the discussed properties in use:
section = matvhist.VhistSection('Advanced Embedded Files');

file = matvhist.VhistFile('MarsSunset.jpg', 'in', 'Sunset on Mars');
file.comment = 'taken from http://en.wikipedia.org/wiki/Sunset';
% file.filetype = 'images/jpg'; % will also be automatically detected

% create preview image
fid = figure;
img = imread('MarsSunset.jpg');
title('Histogram of image brightness')
imhist(rgb2gray(img))
file.previews = {fid};

file.userAttrs('Author') = 'NASA''s Mars Exploration Rover';
file.userAttrs('License') = 'Public Domain';
file.userAttrs('Source') = 'http://marsrovers.jpl.nasa.gov/gallery/press/spirit/20050610a.html';

section.files = [file];
section.appendSectionToVhistFile('advanced-embedded-files.vhist');
Previews for embedded files are not visible within the PDF part of a VHIST file, yet.
More Advanced Embedded Files
By default, all files specified in the files property of the VhistSection
class are embedded by matvhist within the VHIST file. However, there are situations
in which this behaviour is not desirable. If you deal with large files,
embedding these files is not desireable, since it will
drastically increase the size of the VHIST file. Even more, it may not
even be neccessary that VHIST calculates the md5 checksum for a file since
this has already been done by another application and the checksum is already
available.
The VhistFile class provides some flags, which you can modify to change
VHIST's default behaviour. The property embed can be set to false to
prevent the file from beeing embedded within the VHIST file. All
meta-information will still be generated and stored within the VHIST file.
Additionally, we can set the property automd5 to false to disable
automatic calculation of md5 checksums. This flag only has an influence if
embedding has been disabled as well. For embedded files, VHIST will always
calculate a checksum.
By default, embedded files are compressed by VHIST using the flate
compression algorithm (which is for example used by the zip fileformat).
This can drastically reduce the amount of space, which the file requires
within a VHIST file. If the embedded file uses a fileformat, which already
employs compression (such as jpg or png images), however, it is best to disable
compression to speed things up. We can disable compression by setting the
compress property to false.
In some situations, we do not know whether a file does exist or not.
For example, a Matlab routine may have or may have not written an error
log file to disk. In these situations, we can set the optional property
of this file to true to mark it as an optional file. VHIST will then
try to include the file within the VHIST section, however, if the file
does not exist, it will silently ignore the file instead of aborting with
an error.
The following snippet shows the use of the options presented in this chapter:
section = matvhist.VhistSection('More Advanced Embedding Files');

file1 = matvhist.VhistFile('data.zip', 'in');
file1.comment = 'compression has been disabled';
file1.embed = true;
file1.compress = false;

file2 = matvhist.VhistFile('largefile.dat', 'in');
file2.comment = 'not embedded, no md5';
file2.embed = false;
file2.automd5 = false;

file3 = matvhist.VhistFile('largefile2.dat', 'in');
file3.comment = 'not embedded, but has md5';
file3.embed = false;
file3.automd5 = true;

file4 = matvhist.VhistFile('file-may-exist.log', 'out');
file4.optional = true;

section.files = [file1, file2, file3, file4];
section.appendSectionToVhistFile('more-advanced-embedded-files.vhist');
Recording Time and Matlab Diary
Knowing what your Matlab script has done and has not done can be essential,
especially if your Matlab script has malfunctioned and you
realise at a later point in time that the generated data is corrupted.
Therefore, matvhist supports writing the logging information generated by
your script into a log file and embedding this log file within a VHIST file.
Further, matvhist can time how long your script took to run, when it started
and finished and how much CPU time was spend on your script. To perform all
these measurements, create an instance of the class VhistRecorder and
call the methods startRecording and stopRecording at the beginning and
end of the Matlab routines you want to record. Afterwards, you can add
the recorded information to a VHIST section using the method
addInformationToSection. The following snippet depicts this process:
recorder = matvhist.VhistRecorder();
recorder.startRecording();

% your code goes here
performSomeCalculations();

recorder.stopRecording();

section = matvhist.VhistSection('Recorded History');
section = recorder.addInformationToSection(section);

section.appendSectionToVhistFile('history.vhist');
section = section.removeTempFiles();
It is worth noting that addInformationToSection does not modify the
passed section but creates a copy of it and returns this copy. Therefore,
the return value of addInformationToSection should be used.
The logfile generated by VhistRecorder is stored inside a temporary file.
Since VhistRecorder does not know how long this logfile is in use, it
can not automatically delete the log file. Therefore, you have to manually
call the VhistSection.removeTempFiles method after you have appended a
section to a VHIST file and do not need the log file any more.
As of VHIST 1.80.0, temporary files are automatically deleted (thanks to Matlab's onCleanup function).
Embedding Matlab Sourcecode
The sourcecode of your Matlab tool is an important component and is often needed to fully understand what your program has done and why something has failed or returned erroreous results. If your code is under version control, you might want to embed the revision number of the used sourcecode. In many cases, however, it might be easier to just embed the source code itself into the VHIST file. Matvhist makes this easy by providing a function which compresses the sourcecode into a zip archive which is then embedded. The following code snippet shows how to use this function:
section = matvhist.VhistSection('Embedding Sourcecode');
section = matvhist.addSourceCodeToSection(section, '*.m');
section.appendSectionToVhistFile('source-archive.vhist');
section = section.removeTempFiles();
The first parameter of addSourceCodeToSection is a VhistSection
object. The second parameter can either be a single string or a
cell array of strings, containing sourcecode filenames. The strings may
contain the wildcard character * to specify patterns, e.g. *.m or *.mat for
all .m or .mat files in the current directory. The function returns a new
section with an embedded zip archive containing the sourcecode.
The sourcecode will be stored inside a temporary file. This file can not be
deleted automatically. Therefore, you have to manually call the method
VhistSection.removeTempFiles after you have created a section inside a
VHIST file and do not need the sourcecode archive any more.
As of VHIST 1.80.0, temporary files are automatically deleted (thanks to Matlab's onCleanup function).
Organising Workflow Documentation
Workflows are quite similar to streams of water. They start at some source (data), meander through several workflowsteps and finally arive at a destination, e.g. the generated data or a statistical evaluation. And just like a river, workflows may fork and join at various locations. Forks usually appear every time more than one result has been generated by a workflowstep. For example, if the output of a script is a generated image, as well as statistics concerning this image, the postprocessing of both datasets may take completely different paths from this point on. A fork will also appear if the output of one workflowstep is used as input for two or more different scripts. A confluence can be found when data generated by various workflows is used as input in the same workflowstep. A script, which compares two images with individual histories is a good example for such a situation.
Since a workflow is not strictly linear but can fork and converge, it is often not possible to create one linear VHIST file for a complete workflow. Therefore, it makes sense to associate VHIST files not with the workflow itself, but with the files or datasets generated by the individual workflowsteps. For each file generated by a workflowstep, it is best to generate one associated VHIST file. If a generated file is used as an input file in the next workflowstep, append to it's VHIST and save the resulting VHIST file under the name of the output file. If more than one file with an associated VHIST file is used as an input for a workflowstep, append to one of these VHIST files (we will call this VHIST file the VHIST rootfile) and embed the other files as input files. This way, the last VHIST file in a workflow will always contain the history of all files involved in the workflow. The following image shows an example workflow as well as the corresponding VHIST files:
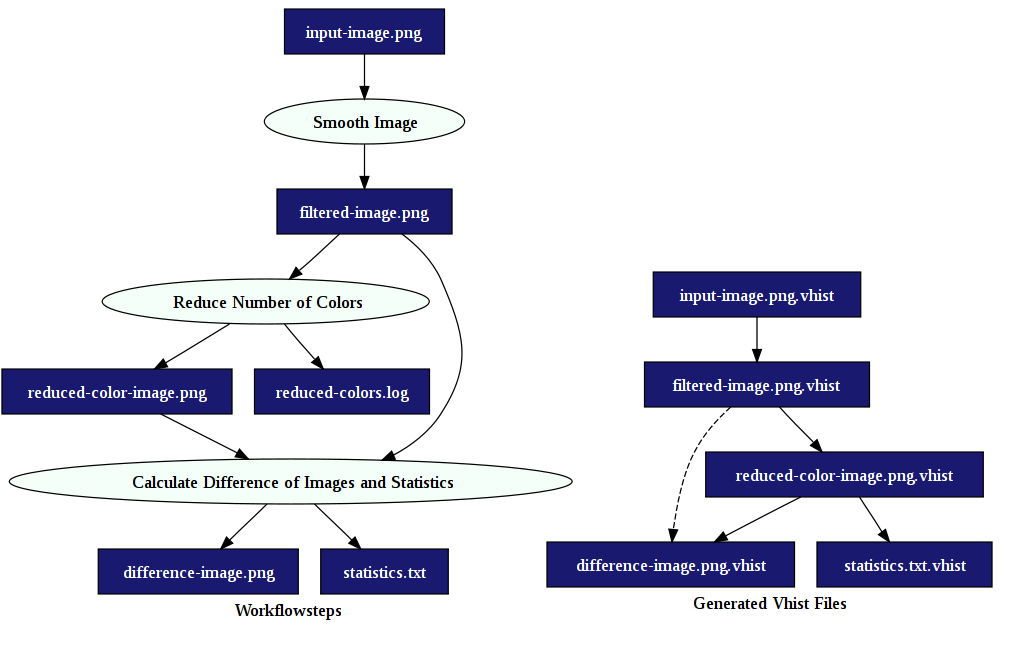
The file input-image.png is used as the source image in this workflow.
We will assume, that this file already has an associated VHIST file
input-image.png.vhist, however, this file does not have to exist.
input-image.png is passed to the workflow step "Smooth Image", resulting
in a new image file filtered-image.png. The corresponding VHIST file
filtered-image.png.vhist is the same as input-image.png.vhist with an
additional section appended to the end.
The next workflowstep reduces the number of colors of filtered-image.png,
generating a new image reduced-color-image.png as well as a log file
reduced-colors.log. For reduced-color-image.png, an appropriate VHIST
file has be created. reduced-colors.log is only a logfile, therefore no
VHIST file should be created. We will, however, include this log file as an
output file in reduced-color-image.png.vhist.
In the next step, the difference of filtered-image.png and
reduced-color-image.png is calculated, resulting in difference-image.png.
Since both files have their own history, we want to merge the history of
both inside difference-image.png.vhist. We reach this by appending one
section to reduced-color-image.png.vhist (denoted by the solid arrow in the
diagram; reduced-color-image.png.vhist is the VHIST rootfile) and
embedding filtered-image.png.vhist as an input file (marked by the dashed
arrow in the figure).
As the last workflowstep not only generates a difference image but also calculates some statistics, we want to keep a history for both results. This can be done by telling VHIST to create two VHIST files. Both will be equal except for the file names.
By organising a workflow this way, the complete history for each and every file is always contained within one VHIST file with the same name as the associated file.
Functions for Workflow Documentation
Documenting workflows, as it has been described in the previous chapter, adds some complexity to the documentation code, which you have to write. To make your live easier, we provide some helper functions which can reduce the amount of code, you have to write.
The method VhistSection.appendSectionToVhistFile takes either a string
or a cell array of strings as input. If one string is supplied, a section
is appended to this VHIST file. If the VHIST file does not exist, yet,
a new file is generated. If a cell array with more than one filename is
given to the method, a copy of the resulting VHIST file will be stored
in the supplementary file names as well.
The method VhistSection.addVhistSection is a more general version
of VhistSection.appendSectionToVhistFile. It takes a list of names
for output VHIST files and an optional filename for a VHIST rootfile.
The method will append the section to the rootfile and save the VHIST
file using the specified output names. Calling
section.addVhistSection({'file.vhist'}, 'file.vhist');
has the same result as
section.appendSectionToVhistFile('file.vhist');
The advantage of appendSectionToVhistFile is that you can append a section
to a VHIST file without modifying the original file.
The function handleVhistFiles takes a VhistSection object, and tries to
detect useful in-, out- and VHIST files. It takes two lists of file patterns,
one for input files and one for output files.
These file pattern list may be either a single string or a cell array of
strings. Each string contains either a filename or a wildcard pattern for
filenames. For example, the pattern list {'*.png', '*.jpg'} will match any
png or jpeg image file. An empty cell array {} will match any file.
The function iterates over all input and output files in the VhistSection
object. For each input file, which matches one pattern in the input patterns
list, a VHIST file with the same name and an additional extension '.vhist'
is included in the section. One of these VHIST files will be used as the VHIST
rootfile. The function will try to select a suitable rootfile.
For each output file, which matches one pattern in the output
patterns list, a VHIST filename is generated. The list of these filenames
is returned. You can use this list in a call to VhistSection.addVhistSection.
handleVhistFiles returns the modified section object, the name of the
rootfile as well as the names of the output VHIST files.
The following example shows how to use handleVhistFiles:
section = matvhist.VhistSection('Structuring Workflows');

infile1  = matvhist.VhistFile('image.png', 'in');
infile2  = matvhist.VhistFile('reference.png', 'in');
infile3  = matvhist.VhistFile('config.txt', 'in');

outfile1 = matvhist.VhistFile('image.png', 'out');
outfile2 = matvhist.VhistFile('statistics.mat', 'out');
outfile3 = matvhist.VhistFile('output.log', 'out');

section.files = [infile1, infile2, infile3, outfile1, outfile2, outfile3];

% find suitable VHIST files
[section, rootfile, outputFiles] = matvhist.handleVhistFiles( ...
                                   section, '*.png', {'*.png', '*.mat'});

% rootfile == 'image.png.vhist'
% outputFiles == {'image.png.vhist', 'statistics.mat.vhist'}
% section.files contains an additional file 'reference.png.vhist'

section.addVhistSection(outputFiles, rootfile);
Vhist Output
Both, VhistSection.addVhistSection as well as
VhistSection.appendSectionToVhistFile, return the returnvalue and
the commandline output of the vhistadd commandline utility. If the
vhistadd commandline utility exits with an error, an exception of the
type matvhist.VhistaddException is thrown instead. This exception type
has two properties returnValue and stdout, which contain both values.
The following code snippet shows some example code to handle exception
situations.
section = matvhist.VhistSection('Structuring Workflows');

try
    [returnValue, stdout] = section.appendVhistSection();
catch ME
    if isa(ME, 'matvhist.VhistaddException')
        fprintf('return value: %d\noutput: %s', ME.returnValue, ME.stdout);
    end
end
Even though VHIST is a tool for creating documentations, it can not document its own failures. Therefore, you should still write out information about exceptions thrown by matvhist methods and later check if everything went smoothly.