
Examples
The following page contains a number of example VHIST documents. Click on the links below the images to download and open the VHIST files. We changed the extensions of the files to .pdf, so that your web browser or file manager will open the files with your PDF viewer. We took screenshots with the Adobe Reader on Linux.
The examples also show the commandline calls (we assume a Bash Shell), that were used to create the VHIST file(s). Some examples require demo data or special software. Therefore you can not simply rerun all of the examples on your local machine. You will, however, get a good idea what was necessary to create the VHIST files on this page.
Example 1: Hello World
You can create the most basic VHIST file with the command:
$ vhistadd -O example1.vhist

Figure 1: On the left: The first page of every VHIST file contains a description of VHIST. You can adjust the contents of this page to your likings and add information about your institute or project. On the right: A VHIST workflow step, which contains a minimum of documentation.
Example 2: A More Complex VHIST File
Such a minimal VHIST file does not contain a lot of useful information. We can add information manually:
# copy a file to another location
$ cp input.txt output.txt

# document this operation with VHIST
$ vhistadd -O output.txt.vhist -s title "Copying a File" -s command "cp input.txt output.txt"
  -i input.txt -o output.txt

Figure 2: A VHIST workflow step, which contains manually added information about a processing step. The paperclip icons show that the files have been embedded. You can extract those files by right-clicking on the paperclip in your PDF browser.
Example 3: Automatic VHIST files with vhistify
Adding information to a VHIST file manually is cumbersome and error prone. Our tool vhistify
can gather and add this information automatically. It will also collect a lot more information:
# do something and create a VHIST file at the same time
$ vhistify --title "Copying a File" cp input.txt output.txt

Figure 3: A VHIST workflow step generated by vhistify. The VHIST file contains a lot of information, that has been gathered automatically.
Example 4: Multiple processing steps
In many cases, a workflow will not contain only one processing step, but several. We can translate this property to VHIST quite easily:
# first step
$ vhistify --title "Copying a File" cp input.txt intermediate.txt
# second step
$ vhistify --title "Copying a File a Second Time" cp intermediate.txt output.txt

Figure 4: A VHIST file with two sections, one for each workflow step. vhistify stores VHIST files for every generated file and extends suitable input files automatically.
Example 5: Documenting Python with vhistify
Documenting the copy tool of Unix is not very exciting. This example will show how to document a simple Python script
# document a python script
$ vhistify --title "Convert File To Upper Case" --plugins=python python toupper.py myfile1.txt

Figure 5: A VHIST file for a simple Python job. Vhistify automatically detects the Python sourcecode and embeds it as a .zip archive.
Example 6: More Complex Python Workflow
When a workflow step uses several input files and each file is associated with a VHIST file,
vhistify will extend one of the files and embed the other one. This way, the complete history
of all files is preserved.
$ vhistify --title "Convert File To Upper Case" --plugins=python python toupper.py myfile1.txt
$ vhistify --title "Convert File To Upper Case" --plugins=python python toupper.py myfile2.txt
$ vhistify --title "Concatenate Several Files" --plugins=python
  python concatenate.py myfile1-uppercase.txt myfile2-uppercase.txt output.txt

Figure 6a: A VHIST file for a more complex workflow of Python scripts. The second workflow step contains the VHIST file myfile2-uppercase.txt.vhist as an embedded file.

Figure 6b: A diagram of the workflow from example 6. The diagram was automatically generated from the VHIST file.
Example 7: Preview Images
You can also embed preview images into a VHIST file.
$ export VHISTIFY_PLUGINS=matlab,previews
$ export VHISTIFY_TITLE="Create a Sinus/Cosinus Plot"
$ vhistify --no-stdin matlab_2011b -nodesktop -r createPlot

Figure 7: A VHIST file with an embedded preview image. Preview images are shown on their own page(s).
Example 8: FSL Workflow
FSL (FMRIB Software Library) is a library of tools for medical imaging purposes. You can easily document processing steps, that involve FSL tools with VHIST:
# set the vhistify plugins globally
$ export VHISTIFY_PLUGINS=fsl

# don't embed NIfTI files
$ export VHISTIFY_DONT_EMBED_PATTERNS='*.nii.gz,*.nii'

# 1) initialize FSL
$ source setup_fsl.sh

# 2) extract brain from MRI
$ vhistify --title="Extract Brain" bet pat_mmm_mri.nii.gz
  pat_mmm_mri-stripped.nii.gz -m -v

# 3) coregister MRI onto PET and store the transformation
$ vhistify --title="Coregister Images" flirt -in pat_mmm_mri-stripped.nii.gz
  -ref pat_mmm_fmz.nii.gz -omat "mr->pet.mat" -v

# 4) segment MRI into grey matter, white matter, csf
$ vhistify --title="Segment Brain" fast -v pat_mmm_mri-stripped.nii.gz

# 5) transform segmentation onto PET image
$ vhistify --title="Apply Transformation" flirt -in pat_mmm_mri-stripped_seg.nii.gz
  -ref pat_mmm_fmz.nii.gz -applyxfm -init "mr->pet.mat" -out segmented_pet.nii.gz
  -v -interp nearestneighbour

Figure 8a: The pages of the generated VHIST document. Other VHIST files that document branches in the workflow are embedded inside the VHIST document.

Figure 8b: A diagram of the workflow from example 8. The diagram was automatically generated from the VHIST file.
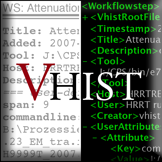
Example 9: User-defined Attributes
VHIST allows you to add user-defined key-value pairs to a VHIST section. You can use these attributes to store any kind of additional information (temperature, algorithm used, number of iterations, patient id, time of measurement) in a VHIST file.
# add user defined attributes with or without unit
$ vhistadd -O example9a.vhist -U numIterations 124 -W size "[256, 512]" pixels

Figure 9a: You can use VHIST's user-defined attributes to store any kind of key-value pairs in a VHIST file.
Download example9a.vhist here.
# add user defined attributes via vhistify
$ vhistify --plugins=stdoutattrs echo "VHISTIFY: size[voxels]=[64, 64, 48]"

Figure 9b: You can also specifiy user-defined attributes for your own programs if you create the VHIST documentation with vhistify.